Page 19
Page 1 - Page 2 - Page 3 - Page 4 - Page 5 - Page 6 - Page 7 - Page 8 - Page 9 - Page 10
Page 11 - Page 12 - Page 13 - Page 14 - Page 15 - Page 16 - Page 17 - Page 18 - Page 19
Page 20 - Page 21 - Page 22 - Page 23 - Page 24 - Page 25
September 2009
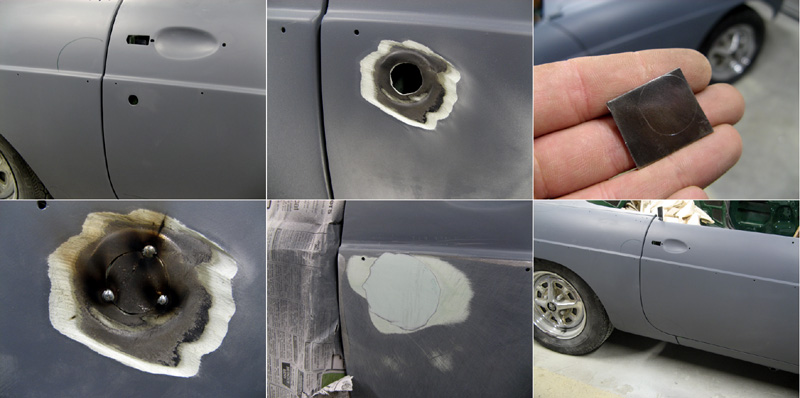
After I had pretty much finished filling and sanding the car (about 85-90 hours work) I decided to
fill over the door lock holes. This was to give a cleaner look and also because new door locks were
going to be horribly expensive and it was cheaper to buy some door lock actuators that will be worked
by the alarm. Also this being a convertible unless the top is up door locks are kind of pointless!
I carefully sanded back around the lock holes and then cut out small metal patches that I welded into
the holes. The picture shows the first tacks but I welded it all around then ground that smooth.
I then faired over them with filler and sanded and sealed it all. The lock actuators should
fit at the rear of the door nicely and directly hook to the linkage the locks usually engage. The lines
drawn on the body are green Sharpie pen marks highlighting bits I wasn't happy with and needed to revisit.
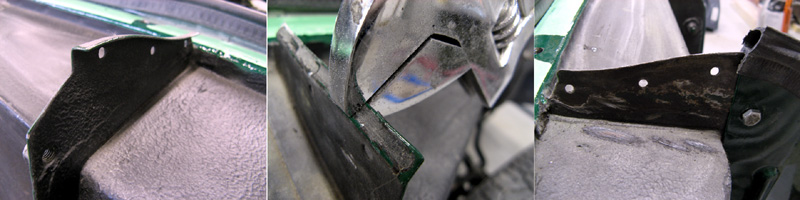
One of the last little jobs on the body was figuring out what to do about the rubber seal that goes
above the trumpet part on the body and the front wing. It is right next to the splash panel that is
behind the front wheels. Originally there was a rubber seal riveted in place here but these don't seem to
be available anymore. When you order the replacement what they send you is a short length of rubber
seal the same as the one along the edge of the splash panel. As it comes this won't fit on the car! The
flange on the body is bent over at 90 degrees at the top edge so the seal can't fit on. What I did was use
an adjustable spanner to bend the flange over then a hammer and dolly to flatten it out. Then I can push
the new seal over it before I bolt the wing in place. Once the wing is on that seal can't go anywhere.
With all the filling and sanding done the car was sent back to the painters. They will now give her a
once over and fix any remaining problems for me. They were very happy with the state she was in when
I delivered her so hopefully they don't need to do much. Next they shoot primer then flat all that back.
Then they spray the insides of the wings and mounting edges. I will go back and bolt the wings on then
the rest of the car will be painted. Hopefully in the next couple of weeks. I was hoping to help with the
final sanding and flatting but I have started getting allergic to the fillers and solvents and it makes
my hands come out in a rash so now I need to avoid the filler and nasty chemicals as much as possible. And
yes, that was despite always wearing gloves when I was working on the car! In the end the worst spot on the
car that needed filler was the right rear corner which needed about 3.75mm of filler to bring it up flush
with the door. I don't think that's too bad for an amateur!
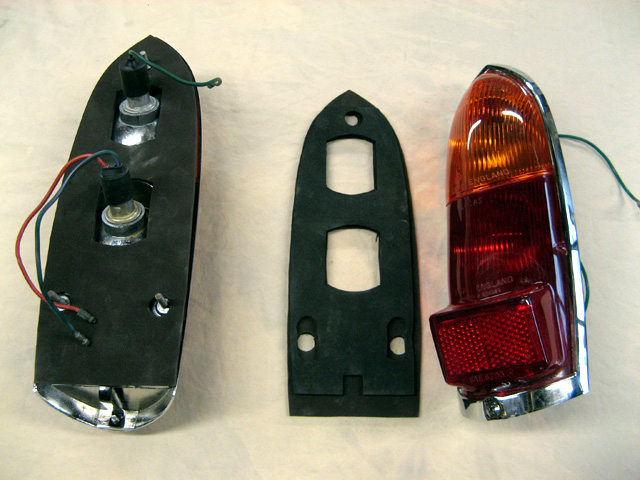
With the body away I am finishing off as many small things before I need to do final assembly. One thing was
make up new gaskets under the rear tail lights as the ones you can buy are rubbish! I bought some 3mm thick
gasket foam and made my own which are a much better fit. You can see them here with one of the old ones
over the new ones I made showing how different the sizes are.
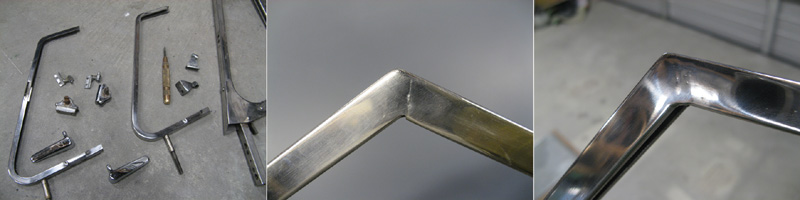
Another small job was totally stripping the quarter light frames down. My hinges and handles were all flaking
and pitted. The problem with doing a total restoration is anything you don't restore stands out like a
hamster wearing a party hat! It looks terrible to have new paint and trim and leather and horrible, pitted
chrome! You can buy new parts but that was going to be more expensive than having the old ones rechromed.
The quality of the remanufactured parts can be dodgy too. So I stripped everything down and they are off
being rechromed. I found the best way to remove things was to drill the backs of the original rivets out
as far as possible without actually going into the piece itself. Then I used the automatic center
punch to slowly pop the old rivets out. This is much safer than trying to drill them all the way through.
One thing I did find was that one quarterlight frame corner was cracked. These are the kind of problems
people don't account for. New ones are available at some ridiculous price so instead I needed to have mine
TIG welded since they are stainless steel. Unfortunately I can't do that myself so I needed to pay someone
to do it. Little things like that add lots of unexpected expenses to any restoration. When the chromed pieces
come back I will reassemble everything with stainless pop rivets (the original blind ones are available but
apparently hard to use), new rubber for the glass and polish everything up.
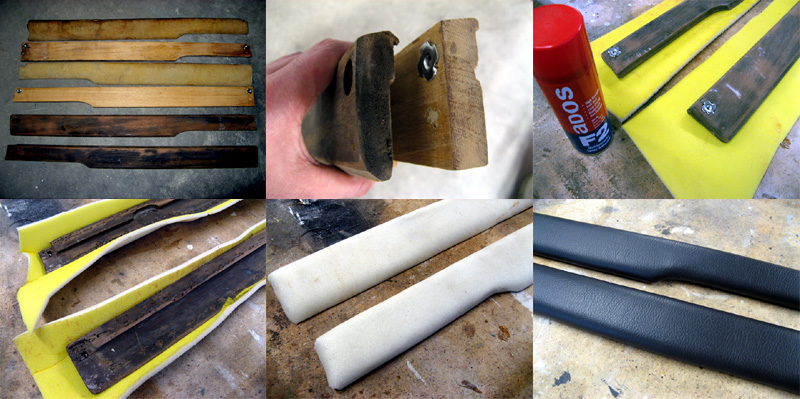
Another little job. I reupholstered my door crash pads. The vinyl to do so comes in the new trim kit but only
the vinyl, not new foam. My car came with two sets of door crash pads in the boot when I got her. One set was
alright but not good enough to use on a restored car. The other set someone had recovered but very poorly. I
stripped the first set and was going to recover them. They are a lighter wood with foam pads. The foam was
not in great condition. It's a very dense rubber type foam, not soft ordinary soft foam. As far as I can tell
new foams are not available anymore (must be one of the few parts that you can't get new now). Just in case
the badly recovered set happened to have good foam I stripped them down too. What I found was interesting.
The foam on them was even worse than the other set and someone had simply glued new foam over the top hence
the bad condition of them. The wood however was sound and it seems to be much better than the lighter wood. The
part is more curved and better finished than the lighter ones. I believe that the dark wood ones are off
a much earlier car while the lighter, more square ones are from a later model. I decided to simply add a
layer of foam to the early, dark wood then recover them. It won't be as padded as the originals but they look fine.
I visited a local upholsterer and he gave me some thin upholstery foam (for free)! It's about 1/4 of an inch
thick. I used spray contact glue to stick that to the wood and simple cut it off flush with the back once the
glue was dry. I then wrapped and stapled the new vinyl over that. You don't need to glue the vinyl onto the
foam at all. They came out really well and should look great when the metal end pieces come back from the platers.
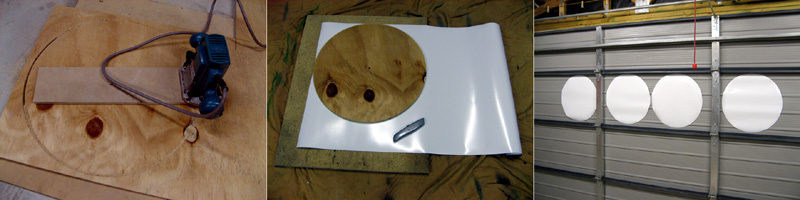
On thing I want to have on the car to go with the whole Sebring race/rally car look is number roundels. These are
the large white circles racing numbers would go in. I am not having numbers but do want the white circles.
Normally these would be painted on or be vinyl transfers I imagine but that's a rather permanent solution.
Since I am not sure how they will look I decided to use magnetic sheet. That way I can stick them on and if
I don't like the look take them off again (and use them as giant fridge magnets?). I bought a 2m roll of white
magnet that's specially designed for use on cars. I then used a router and a circle cutting jig I made to cut a
500mm diameter disc from some scrap plywood. I then used this to cut out the roundels from the sheet using a
Stanley knife. The door roundels will need a strip cutting from the middle of them where the chrome strip on
the door is. When I get the front and rear valences painted I will get them in the same shade of white as the
roundels. I doubt anyone would notice if they were different shades but I believe if they are the same then the
car will look more correct and look 'right'. If they are different shades no one will pick the difference but
in the back of their minds the car will look 'wrong' but they won't be able to say why!
Page 1 - Page 2 - Page 3 - Page 4 - Page 5 - Page 6 - Page 7 - Page 8 - Page 9 - Page 10
Page 11 - Page 12 - Page 13 - Page 14 - Page 15 - Page 16 - Page 17 - Page 18 - Page 19
Page 20 - Page 21 - Page 22 - Page 23 - Page 24 - Page 25