
June 24th 2007
Good news, everyone! Here is a story about building my very own Bender. This, as everyone should know, is the foul mouthed, cigar smoking, booze drinking, shiny metal arsed, bending robot from the programme Futurama. More information can be found in the Wikipedia Futurama entry .
Of course just having a Bender that doesn't do anything would be a waste of time so mine shall be used for a practical purpose. One Bender himself would be proud of. I'll use him to make beer! This was actually done in the show in the episode "The Route of all Evil". The idea was suggested to me by my drinking buddy Dave. I didn't remember this until he provided the proof (typos and all):
[3/30/2007 9:21:20 AM] Simon Jansen says: Everytime I watch Futurama I want to build a bender.
[3/30/2007 9:24:14 AM] David Moore says: do you remember the episode where they brew beer inside Bender?
[3/30/2007 9:24:26 AM] David Moore says: you should build that.... a Bender brewer
[3/30/2007 9:24:28 AM] Simon Jansen says: Vaguely.\
[3/30/2007 9:24:37 AM] David Moore says: he gets all maternal
[3/30/2007 9:24:42 AM] Simon Jansen says: I could buil done out of real steel.
[3/30/2007 9:26:49 AM] David Moore says: season3 episode12: The Route of All Evil
[3/30/2007 9:26:56 AM] David Moore says: title refers to money, not beer
[3/30/2007 9:27:27 AM] Simon Jansen says: How about a Bender beer fridge? Get one of those mini fridges and build that into him?
[3/30/2007 9:28:00 AM] David Moore says: no a brewer
So, credit where credit is due!
In addition to this my Bender shall talk thanks to his very own brain. A brain, again as specified in the show in the episode "Fry and the Slurm Factory", made from a real MOS 6502 processor. This processor powered some of the great early computers such as the Vic 20 and the Apple 2 (both of which I have owned at some point). What follows is how to go about doing this. Bender is not yet complete but I shall explain what I have so far and add more as he is completed.
The first problem was figuring out what Bender looks like. Of course everyone knows what he looks like right? This is true but Bender is a cartoon character and trying to make a 2 dimensional character into a real, believable thing isn't easy. You only have to look at Anakin the Manikin from the new Star Wars films to see that! I started by watching as many episodes of Futurama as possible then searching the net for pictures. Then I started making my own drawings of Bender. I certainly didn't get every detail exactly right but I think he is sufficiently Bender like to be instantly recognisable. I had to do a best guess at Benders height but to the top of his antenna he seems to be about 6 feet tall. In the episode "The Cyber House Rules" we get to see a mug shot of Bender that also shows his height to be about 6 feet. The body dimensions were chosen to look about right and so that my beer brewing barrel would be able to fit inside the body. When I have built other props and models in the past they have always been actual objects to start with. You can often find real dimensions to work with or else work them out yourself from photographs and screen shots. You can't easily do that from a cartoon. From my first rough sketches I started drawing more detailed plans taking into account how I would physically build him. I then transferred these small drawings onto a piece of paper taped to the back of a door. This allowed me to draw Bender full size to make sure the proportions looked right. I did need to tweak my dimensions a little still but I finally got him looking about right. Or so I thought.
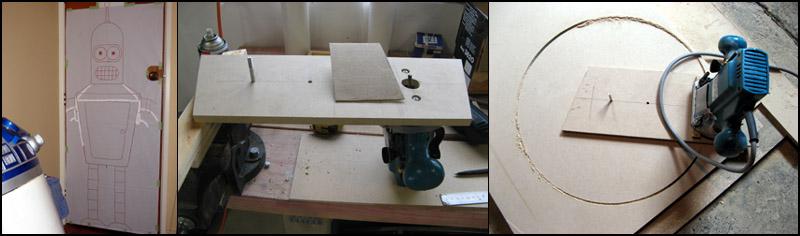
Figure 1. The door plan, router circle jig, cutting circles with the jig.
Once I had the basic shape figured out I had to start thinking about how to physically build him. This is the part I like best. I decided to use a building style I had tried once before on a still unfinished R2D2 I was making. The basic frame is made from rings of MDF with round dowels to hold them together and provide a frame. On R2 I had planned to wrap the body in white styrene sheet. I decided to make Benders body a little differently. I used cardboard as a covering that is then overlayed in fibreglass. Because Benders body is smooth this should work rather well. His legs are straight as he has to take the weight of a beer brewing barrel on them. The body, head and shoulders and arms can all be very light weight.
The body base and top (and feet and head) are circular so I needed a way to cut nice circles from the MDF. The way to do this is to make a jig to hold a plunge router and use this to make the circular cuts. The jig is simply another piece of MDF with the router bolted onto one end and a hole for a pivot somewhere on it. Obviously by changing the pivot point you can change the size of the circles cut. Since Benders body tapers and I needed to attach vertical dowels to the outside of it I had to make the cuts on the top and bottom of the body with a taper. To do this you simply mount the router on the jig at an angle. From my full size door drawing and with a little trigonometry I was able to measure the angle needed and set the router up appropriately. I cut the first discs and made Benders body by then screwing lengths of dowel to the outside of the discs. You need to make sure the two discs are both centered correctly but a few pieces of scraps timber as a temporary frame and a plum bob allowed me to do this. Once I had completed the body I discovered I'd had a visit from Mr. Cock-up and mangled the angle of Bender's dangle! I had made the body too tapered. So, like any good perfectionist, I threw that one away and made another. I modified the shape slightly to make the body more cylindrical and I also tweaked the height and width. The new body came out looking much nicer.
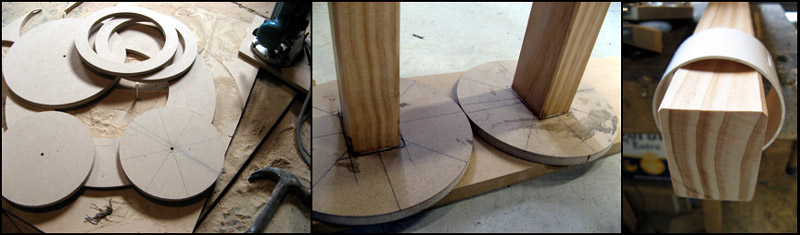
Figure 2. Routed rings (with dead squished Weta), feet and leg details.
Once the body frame was done I made the shoulders and head. The head is simple. It's just two rings of MDF with dowels making up the sides to form a cylinder. The dome on top is added later. The shoulders are a little trickier. The lower part is another ring of MDF with the correct taper for the shoulder cut into it. Leading up from these are dowels cut on an angle. These dowels go up to an upper ring that is the same diameter as the bottom of the head. The head and shoulder parts are designed to lift off the body so you can get to the beer brewing barrel inside. Even though the body does have a door on the front (which shall be made from thin car steel) this isn't a big enough opening to get the barrel in and out. The door opening sides are formed by the wooden framing dowels. The top and bottom of the door frame are made from curved pieces of MDF. I used a Dremel tool to cut round notches into the ends of these pieces so they will fit tightly against the round vertical dowels. They are then glued into place. The legs and feet were again made from wood. The feet are made from two discs of MDF held together in the middle with a steel strap across the top of them. The legs are made from two straight pieced of timber simply glued and screwed to the round foot base. As mentioned they are perfectly straight so that the weight of the beer inside him is transferred straight down to the feet.
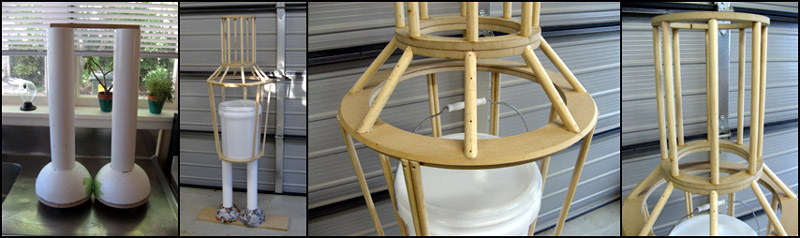
Figure 3. Feet domes, frame, shoulder and head detail.
The domes for the eyes, head and feet are polystyrene balls cut in half with a hot wire. The wire is nichrome resistance wire from the local electronics shop. I simply held two pieces of wood in the vice in a V shape and strung the wire tightly across them. A battery charger supplied the current. The size of Benders feet and head was carefully chosen so that I could get the spheres in the exact sizes I needed. I am also using cut up polystyrene spheres for the shoulders. One sphere was cut in half to make the feet. A hole was made in each half so they could slide down over the wooden legs. Then the 80mm diameter PVC down pipe was slid down over the top of the legs. The legs were then screwed and glued to the base of the body. The dome on the top of the head was another half sphere of polystyrene glued to the top of the head cylinder. Before fibreglassing using polyester resin you have to seal the polystyrene otherwise the resin will eat it away! To seal the polystyrene away I used several techniques (I make this stuff up as I go along so it's all trial and error) and they all seemed to work well. The feet I covered in several layers of Papier-mâché. I then used a thick acrylic house paint to seal over that. For the head I used aluminium foil glued over the dome then again multiple layers of acrylic paint. I suspect just using paint would have been enough as long as there are enough layers to completely seal the dome.
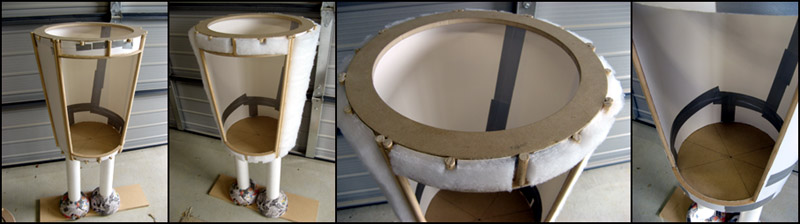
Figure 4. Covering the frame and insulating.
Once the legs were attached I could cover the body. The body is actually double skinned as I glued thin card to both the inside and outside of the frame. Between the two layers I used quilting material as insulation. The idea being it should be easier to keep Benders internal temperature constant which I think is better for when the beer is brewing inside him. The shoulder part is also covered in thin card. The shoulders will actually be finished off last as I want to build the base of them up to exactly fit the outline of the top of the body. This should give Bender a nice even join between the body and the shoulders. Small wooden dowels will be used as locating pins between the head and shoulders and the shoulders and body. The head was also covered in thin cardboard and the eyes made up from cardboard with another polystyrene sphere cut in half for the actual eyes. Again these were sealed with glued on foil and layers of acrylic paint. The antenna, added after the head was fibreglassed, was kindly made for me by a skilled wood turner. Actually I don't know that this particular piece taxed his skills much as it only took him a few minutes to make! The bottom of the antenna was glued into a hole in the top of Benders head. The polystyrene of the dome was drilled out and we also bored a hole right down the centre of the wooden antenna. Through these holes I run a wire to a ultra bright red LED. The LED is stuck into an opaque plastic sphere at the top of the antenna which lights up red whenever Bender's remote is used. The sphere is the ball from a roll on deodorant and happened to be almost exactly the right size!
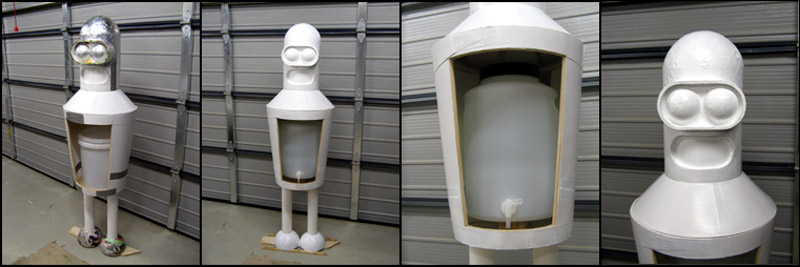
Figure 5. Foiling and painting (yes, and unfortunate beer tap placement).
Once all the cardboard was in place I covered everything in layers of fibreglass. I am using polyester resin (instead of epoxy resin) since it is cheap and easy to work with. If you need to add more layers later you can just lay them on over what you have already done. I am using woven cloth instead of chopped strand mat as it was easier to work with over the surfaces I needed to cover. I applied cloth to both the inside and outside of the body and over the top of the PVC legs as it will be much easier to paint the fibreglass on the legs rather than trying to paint PVC. Only one layer was needed on the legs as there is no need for strengthening there. The body needed about three layers to make it sufficiently rigid. Once the fibreglass has set you can begin trimming the excess and start sanding. This takes a long, long time and created quite a lot of dust so I did this outside wearing a good dust mask. It is work mentioning that when laying up the fibreglass I also used a good respirator (with solvent filters) and wore gloves. You don't really want to breathe in the fumes or let the resin contact your skin. Bender has only been roughly sanded so far. To get him really smooth you also need to apply car body filler (we call it bogging down here in NZ) then sand that off to get a nice smooth surface to paint. It takes a lot of filler to get a nice smooth surface. You end up applying a lot then sanding most of it off again but it is necessary to do this if you want a nice finish before painting.
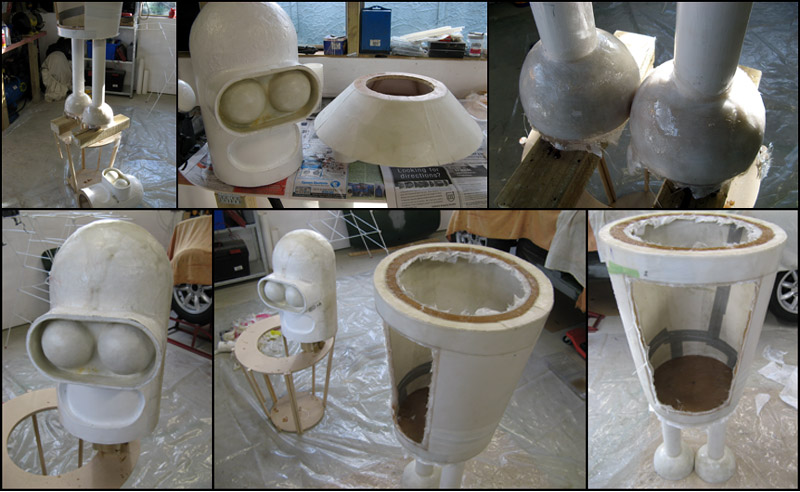
Figure 6. Fibreglassing the parts.
Before I finish bogging/sanding him I need to build the arms. When I started I wasn't quite sure how to make the arms. I was confident some inspiration would come to me! The first thought I (and most people) have is to use flexible ducting. This would have been good as it would allow the arms to bend and be moveable. I decided against it for several reasons though. The first reason was I don't think it will look correct. Benders arms and legs are smooth with five black lines around them to highlight the sections. Flexible duct doesn't have the correct smooth shape. The second, and main reason, was simply because I couldn't get ducting the correct diameter. I needed something that would match the 80mm diameter of the PVC I used for the legs. I have now decided the arms will need to be rigid (although able to rotate) and they will be made from fibreglass over some kind of central core. The core is made from something I discovered in the local plastics shop and is something I have used as a former for curved mud guards on a mini bike project in the past. Pool noodles! These are long tubes of foam used as flotation devices by children in swimming pools. They are almost exactly the right diameter and they have a hole right through the middle of them. My current plan is to use a piece of half inch copper water pipe bent into the correct shape for the arms. The pool noodle will slide over the copper pipe which will hold it in the correct curved shape. The shoulders will be attached firmly to the body but the base of the arms will be pivoted inside the shoulders so they arms can be rotated into different positions. The hands will probably be made from a cardboard or plastic former again covered in fibreglass. The fingers can simply be wooden dowels.
That is basically where Bender's body is at today. Since it is Winter here now and the weather has been somewhat unpleasant I have been spending a lot of time indoor working on the other major part of the Beer Brewing Bender project - the brain!
Next page 2